Warp
This tool allows you to warp your drawings thanks to an algorithm giving elasticity to your pixels:
The Warp tool is only available to TVPaint Professional users.
Basics
We will use the following drawing to explain what one can do with the Warp tool:

Selecting the Warp tool will make a grid of small blue squares appear over your drawings. Blue circles will also appear when your pen's cursor hovers over the squares' intersections. These blue circles act as handles which you can pull around in order to warp your drawing. Your drawing will still maintain some integrity, even if you warp it.
Once satisfied with your settings, click on the Apply button in the Tool Panel to complete the warping operation (you can also use the ["Enter"] shortcut to do so). Clicking on this button will also reset the grid to its default state.
Clicking on the Tool Panel's Reset button will allow you to go back to the original version of your drawing, unless you clicked on the Apply button. You can still revert back to your original drawing after applying the changes using the Undo function.
When using the Warp tool, the Undo function will only work once you have applied the changes.
Locking points / pins
You can also use pins to lock an area of your drawing. We can create an anchor at the top of the sheep's neck, just below its head. To do so, you only need to right-click on a point and select the Lock this point option:

Right-clicking on a locked point will allow you to unlock it through the Unlock this point option.
Let's create other points on the neck line to have a better anchoring:
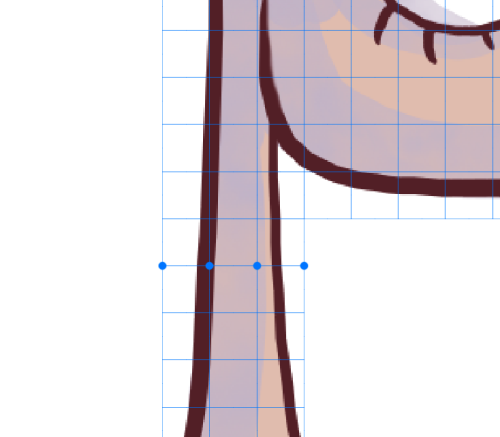
Once these pins are locked, we will be able to move the sheep's head by having minimal interaction on the neck. If you create two more pins, you will be able to move the ear without any interaction with the stalk, or vice-versa:
Holding the ["Shift"] key allows you to circle the area containing all the points you wish to select in order to lock them. Once your selection is done, right-click on any of the selected points to make a menu appear and click on Lock this point to lock them all. Once locked, simply right-click on any of those selected points to unlock them all at once by clicking on the Unlock this point pop up. You can then unselect all the points by clicking outside the grid.

Using the ["Shift + Click"] shortcut allows you to select and lock a point immediately:

- Clicking on the "Apply" button will also reset your grid to its default state and unlock all your points.
- Clicking on Reset will undo any warping changes but will also delete your pins.
Additional controls
You can also:
- Move around the drawing you are applying the Warp tool to by holding the ["Ctrl"] key.
- Rotate the drawing you are applying the Warp tool to by holding the ["Ctrl + Shift"] keys.
- Resize the drawing you are applying the Warp tool to by holding the ["Ctrl"] key while right-clicking.
Warp tool settings
Specific options will be available in the Tool Panel when the Warp tool is selected:
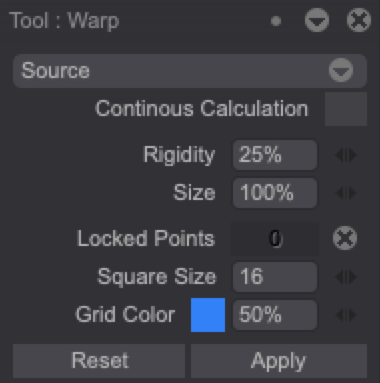
- The Source setting allows you to choose a source the Warp tool will be used on:
- Current Image: this option is ideal to correct an image’s little flaws. Keep in mind that warping an image many times may alter its quality.
- From Library: this option is ideal if you want to warp a particular element without altering the quality of your whole image. However, you will need to store the elements you wish to warp in the project’s Library beforehand. If this option is selected, the Library will open. Double-click on the image you wish to use the Warp tool with. By always having the same source, you will be sure not to degrade the quality of your image's pixels after several manipulations.
-
Rigidity: will allow you to give more or less elasticity to your source by choosing a percentage value between 1 and 100.
-
Continuous Calculation: if activated, the Warp tool will compute the grid's rigidity continuously while you're not using it. When the result suits you, uncheck the function to deactivate it and stop the processing.
-
Size: will allow you to modify your image's size with a percentage value.
-
Locked Points: will allow you to see the number of locked points and unlock them all using the cross icon located on the right.
-
Square size: allows you to change the grid's square size by choosing a value between 4 and 100. The smaller the squares, the more the warping will be precise. However, it may also be slower to interact with depending on your computer's resources. The larger the squares, the less precise the warping will be. Processing will be faster, but the number of warping possibilities will be limited.
-
Grid Color: this function allows you to change the grid’s (i.e. the squares) color. You need to click on the little blue (by default) square to change your cursor into a color picker. You will then be able to select another color in the Color Panel or in the software’s interface. The adjacent value (50% by default) allows you to modify the grid’s opacity.
Note that the Warp tool's Reset button does not behave like TVPaint's other reset buttons since it doesn't revert the settings' values back to their default values. You will need to manually change the settings' values to go back to the default ones.