Perspective
The Perspective tools allows you to change the perspective of your current drawing. To do so, you can simply use the HUD. Moving the position of the control points located in the corners of the drawing is usually enough to get satisfying results. Changes will be previewed in real time but will only be applied when pressing the ["Enter"] key or clicking on the Apply button located at the bottom of the Tool Panel.

A blue line can appear on the Canvas when you are changing your drawing's pespective: this is the horizon line. Two vanishing points represented as blue squares on this line can be move to help You fine-tuning your image or selection’s perspective.
Specific options will be available in the Tool Panel when the Perspective tool is selected.
Move options
- Select the Move Image option to take the entire current image into account when changing its perspective.
- Select the Move Selection Shape option to change the perspective of your selection shape only: your image will not be affected by the change.
- Select the Move Selection Content option to change your selection's and its contents' perspective simultaneously.
Numerical values
If you don't want to use the HUD, you can change your drawings' perspective using the "Xn" and "Yn" numerical value fields.
Reset
Clicking on the Reset button resets the Perspective tool settings.
Antialiasing settings
The drop down AAliasing menu is identical to the Transform tool one and allows you choose between different anti-aliasing algorithms and apply them to the current perspective adjustment. The better the filter's quality, the more time your transformations will take to be applied. You can choose between four different algorithms:
- None: no anti-aliasing will be applied.
- Medium: a basic, performance-friendly filter.
- High: a more effective but more CPU-intensive filter.
- Highest: the most effective anti-aliasing filter. It also takes the most resources.
Apply on and apply the changes
It is possible to change the perspective of several images at once. To do so, select them before applying the changes, or use the Apply On menu reviewed in the previous pages of the manual, should you want the transformation be applied to several Layers at once. By default, the Panning, Transform and Perspective tools' changes will be applied on Instance Heads only. Instances will be reviewed in a later section of this manual.
Contextual menu
Right clicking on the project window while the Perspective tool is being used will make a contextual menu with additional options appear:
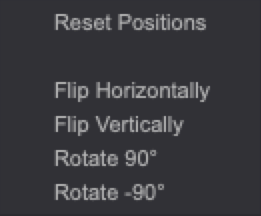
You will then be able to Reset Positions, Flip your image or selection (Horizontally or Vertically) as well as Rotate them to 90° or -90°.