Modify a project
The Modify Project option can be found in the Project main menu (or called using a shortcut you can set up through the Edit > Shortcuts menu). Selecting it opens the Panel below:
-
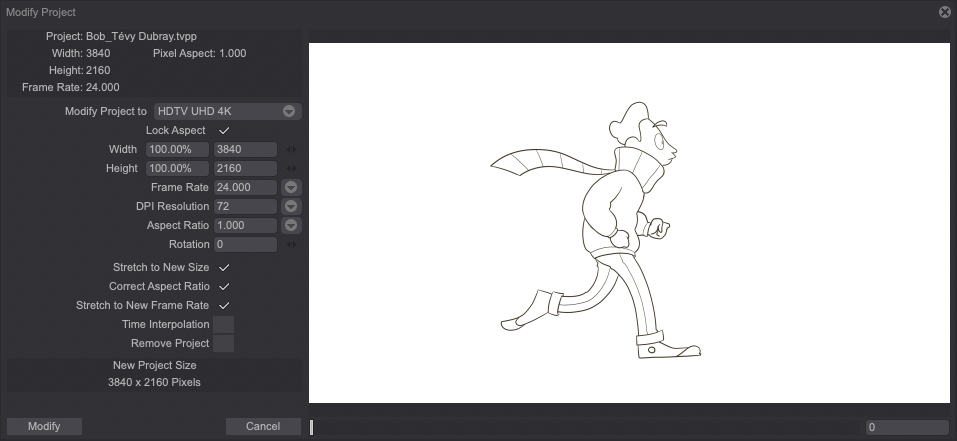
The Project's properties are indicated on the top left-hand corner of the window and include: the current Project's Name, Width, Height, Frame Rate and Pixel Aspect settings. Your Project's future size after modifications is displayed at the bottom of the window.
-
The first dropdown menu let you select a predefined format for the modified Project. For example, it is possible to modify a Project originally in VGA format to NTSC format.
-
The fields located under this first dropdown menu change according to the selected format. Of course, you may modify your Project for it to suit a custom format (for example to create an animated GIF on a website). All you have to do is setting each option manually: Width, Height, Frame Rate, Print Res. (DPI), Aspect Ratio (tiny dropdown menus allow you to select preset values for the Frame Rate, Print Res. (DPI), and Aspect ratio parameters). You can also change your Project’s Width and Height by entering percentages. For example, you can choose to make your Project 80 percent of its current size.
-
The Lock Aspect checkbox allows you to keep the width to height ratio of the original Project (if checked).
-
The Rotation parameter is used to rotate the Project by 90, 180 or 270 degrees.
-
By default, when the Modify Project function is used, TVPaint Animation keeps your original Project as is and creates a new Project which is modified according to the settings you have selected.
- The Stretch to New Size checkbox enables, when turned on, the resizing of your original Project to a the new set size.
- The Correct Aspect Ratio checkbox forces the program to respect the original image's aspect ratio (this avoids the creation of images of weird proportions).
-
The Stretch to New Frame Rate button, when checked, increases or decreases the number of images so that your new Project has the same duration as the original project. For example, if your original Project displayed 24 images/second and your new Project's frame rate is set to 12 images/second, your modified Project will last twice as long (the number of images is, by default, preserved). If the button Stretch to New Frame Rate is checked, some images will be deleted so that the original Project and modified roject have the same duration. Should it be the other way round (the original Project being set to 12 images/second, and the modified one to 24 images/second), the modified Project will be shorter than the original Project. If the Stretch to New Frame Rate setting is checked, intermediate images will be added to the modified Project to make it coincide with the duration of the original Project.
-
Check the Time Interpolation setting if you want Layers' to be stretched or shrunk through interpolation when the the Stretch to New Frame Rate box is checked.
-
Check the Remove Project setting to automatically close your original Project after confirming its modification.
Use of the Remove Project option is at your own risk: you will not be able to reopen an unsaved Project through the Undo function.
Note that your original Project’s Guides will be kept in the modified Project.