Overview
Guides can be used to easily draw concentric circles, parallel lines or add vanishing points to your Canvas.
Click on the ![]() icon to open the Guideline Panel. You can also open it by clicking on the "Windows > Drawing > Guidelines" menu item:
icon to open the Guideline Panel. You can also open it by clicking on the "Windows > Drawing > Guidelines" menu item:

You can leave the Guideline Panel open at all times if you want to. It does not prevent you from drawing or animating. You can also put it in a Drawer.
Clicking on the Add drop down menu will give you access to 11 different Guides. You will also notice two icons:
 allows you to show or hide all the Guides, as well as demagnetize them.
 allows you to magnetize or demagnetize all the Guides.
The Edit function allows you to edit an existing Guide on the Canvas. You need to click this button again to exit the edition mode. The button will turn blue when edition mode is on and grey when it is off.
You can create identical Guides within the same project. Guides can be combined with each other. Newly created Guides will be placed on top of the list.
Global settings
Creating a Guide will give you access to individual controls for this Guide. All guides share a few common settings:
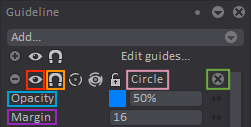
- : allows you to show or hide the selected Guide.
- : allows you to magnetize or demagnetize the selected Guide.
- Guide name: double-clicking on the default name of a Guide (Circle in the image pictured above) will allow you to rename it.
 : clicking on this cross icon located on the right of a Guide will close it but also destroy it. There will be no way to retrieve this Guide afterwards.
- Opacity: Sets the opacity level of a Guide as well as the Assist tool cue's if turned on (more on this below). You can also change a Guide's and a cue's color by clicking on the colored (by default blue) square on the right of the Opacity setting. Your cursor will the turn into a color picker allowing you to choose a new color for this Guide / cue anywhere in the software's interface.
- Margin: this function will make your cursor automatically follow a Guide when it is located within the margin range set for this Guide. If your cursor is located farther away than the set value, it will not follow the Guide anymore.
Unique settings
Some settings are only available when using the Line, Segment, Circle, Ellipse, and Vanishing Points Guides.
The Assist tool
The Line, Segment, Circle, Ellipse and Vanishing Points guides share a special function called the Assist tool. It is symbolized by the following icon when turned on: ![]()
Turning this setting on will help you to draw perfect lines, segments, circles, ellipses... parallel to the corresponding guide. You can turn this tool off by clicking on its icon. It will then be replaced by the following icon, denoting that the Assist tool has been turned off: ![]()
When on the Assist tool will display a visual cue. You can turn this visual cue off by clicking on the Show/Hide icon: ![]()
If you draw with the Assist tool off, your pen cursor will follow the Margin value you have set for this Guide. Should you deviate just a little bit from this Margin, your line will no longer be perfectly parallel to the Guide.
Locking Guides
If multiple Guides have been created, you can use the ![]() icon to lock them in place while you are editing the Guide you want to modify. Note that you can only lock Line, Segment, Circle, Ellipse, and Vanishing Points Guides.
icon to lock them in place while you are editing the Guide you want to modify. Note that you can only lock Line, Segment, Circle, Ellipse, and Vanishing Points Guides.