Shape tools
Shape tools are located in the Main Panel:

Select one of them to set the shape your brush will make when drawing.
The Stroke Shape
Click on the ![]() icon to select the Stroke shape. This shape allows you to draw freehand strokes.
icon to select the Stroke shape. This shape allows you to draw freehand strokes.
You can use the "D" keyboard shortcut to select this shape.
Click-and-hold or right-click on the Stroke shape icon to make the following sub-options appear:
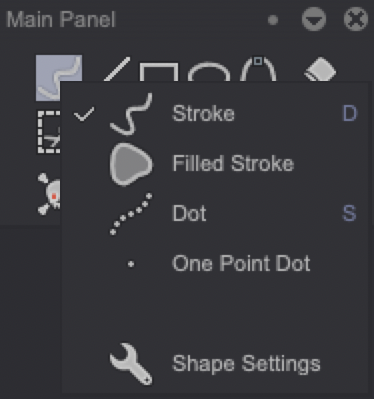
You will then be able to select other related shapes or parameters:
- The Filled Stroke, to create freehand, color-filled, shapes.
- The Dot, to create freehand, dotted, strokes ("S" keyboard shortcut).
- The One Point Dot, to draw single dots.
- Clicking on the Shape Settings item will open the related window, which parameters are explained below.
The Line Shape
Click on the ![]() icon to select the Line shape and draw lines on your Canvas.
icon to select the Line shape and draw lines on your Canvas.
You can use the "L" keyboard shortcut to select this shape.
To draw a line, click-and-hold on your Canvas to define the line's first endpoint. Then, move your pen to the desired location of the line's second endpoint and release it from your tablet.

Hold the "Shift" key to draw perfectly horizontal and vertical lines, as well as parallel diagonals. Using this modifier key with the Stroke and Dot shapes selected will allow you to do the same with those shapes.
Click-and-hold or right-click on the Line shape icon to make the following items appear:
- The Filled Line shape, which can be used to create color-filled shapes drawn using straight lines. You can press the "Enter" key to automatically close and fill the shape you will have started to draw.
- The Shape Settings item, which parameters are explained below.
The Rectangle Shape
Click on the ![]() icon to select the Rectangle shape.
icon to select the Rectangle shape.
Click-hold on your Canvas to define the rectangle's upper-left corner. Then, move your pen to the desired location of the rectangle's lower-right corner and release it from your tablet.
Hold the "Shift" key to draw a square instead of a rectangle.
Click-and-hold or right-click on the Rectangle shape icon to make the following items appear:
- The Filled Rectangle shape, which can be used to create color-filled rectangles.
- The Shape Settings item, which parameters are explained below.
The Ellipse and Circle Shapes
Click on the ![]() icon to select the Ellipse and Circle shapes. The default shape will be an Ellipse.
icon to select the Ellipse and Circle shapes. The default shape will be an Ellipse.
When using an Ellipse shape, hold the "Shift" key to get a perfect circle.
There are two ways to draw Ellipses and Circles in TVPaint, depending on the particular Ellipse or Circle shape you will have chosen by right-clicking or clicking and holding on the Ellipse icon.
Regular Ellipses and Circles
Clicking on your canvas will set the Ellipse's or Circle's center. Drag your pen away from the center to draw the Ellipse or Circle:
2 Pts and 3 Pts Ellipses and Circles
2 Points Ellipses and Circles are drawn by defining their diameter through click-and-hold. 3 Points Ellipses and Circles are drawn by defining their diameter and rotation angle through three clicks.
Filled Ellipses and Circles
Right-clicking or clicking and holding on the Ellipse icon will allow you to choose Filled Ellipses and Circles shapes. It will also give you access to the Shape Settings item, which parameters are explained below.
Splines
Click on the ![]() icon to select the Splines shapes.
icon to select the Splines shapes.
The default spline is a 3 Pts Spline but clicking-and-holding or right-clicking on the spline icon will give you access to Bézier, B-Spline and Filled splines.
3 Pts Spline
To draw a 3 Pts Spline, click-and-hold on your Canvas to define the spline's first endpoint. Then, move your pen to the desired location of the spline's second endpoint. Release your pen from your tablet and hover over it to set the spline's curve and click again on your canvas to draw the spline:

Bézier and B-Splines
Bézier Splines and B-Splines can be used to draw more complex splines. Click on the Canvas to create control points and define a spline with those tools. You will be able to edit the control points as follows:
- Click on one of the control points and move your pen to edit the spline. Bézier Splines also have yellow tangent handles you can control.
- When using the Bézier Spline, hold the "Ctrl" key and click on a tangent handle to break it and move it independently from the other.
- Hold the "Ctrl" key and click on your canvas to move your spline.
Additional controls will also be available when right-clicking on your canvas:
- Delete a control point by right-clicking on it and then selecting the Delete Point item from the menu. You can also use the "Shift + Suppr." keys to do this when a control point is selected.
- Close your spline by clicking on the Close Spline item.
- Erase the current spline by clicking on the New Spline item.
- Draw the spline by clicking on the Apply Spline item. You can also use the "Enter" key to do this.
- The Add to Bin option saves the current spline so you can re-use it later on (you will be asked to give your spline a name). The saved spline will then appear at the bottom of the very same menu: just click on its name to load it on your canvas.
Here is an example showing a Bézier Spline being drawn:

Filled Shapes Settings
Fill settings for the Filled shapes can be adjusted in the Tool Panel and are the same as the Paint Bucket's. Thus, they will be explained in this sub-section of the user guide. The fill color is determined by the Color Panel's settings.
Shape Settings
The Shape Settings window can be used to adjust several advanced parameters which will be covered later on.
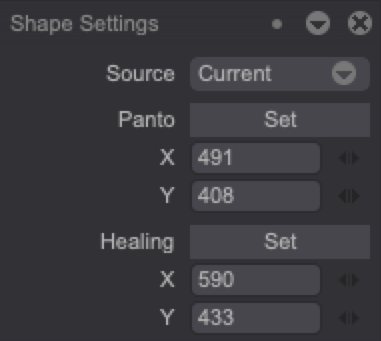
It allows you to set a Source and Coordinates for the Panto and Healing drawing modes. It is also used to set a Source for the Custom Brushes' Smear Source mode.